


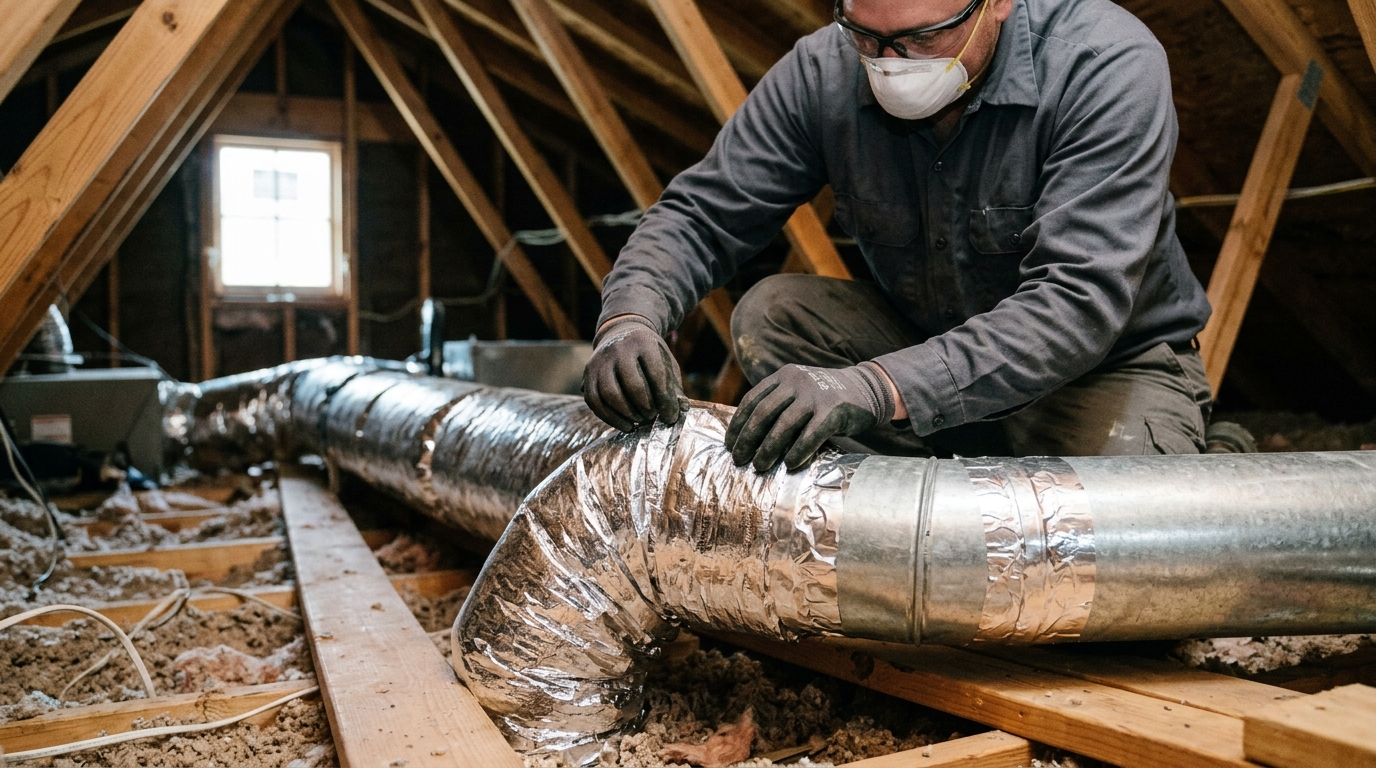
If your energy bills keep climbing while certain rooms never quite reach a comfortable temperature, the culprit may be hiding in your attic, basement, or crawlspace: uninsulated or poorly insulated ductwork. Every degree of conditioned air lost in transit is a degree your HVAC system must work harder to replace. That drives up costs and shortens equipment lifespan. Choosing the right hvac duct insulation—matched to the correct material, R-value, and installation method for your home’s specific conditions—can fix these issues and bring back both comfort and efficiency. This guide breaks down exactly what New Jersey homeowners need to know in 2026 to make an informed, lasting decision.
Why HVAC Duct Insulation Matters for Your Home
How Uninsulated Ducts Waste Energy
Ductwork running through attics, crawl spaces, and basements passes through areas that get very hot or very cold. Without insulation, conditioned air loses its temperature before it ever reaches your rooms. Studies show homes can lose up to 30% of heating and cooling energy through uninsulated or poorly sealed ducts.
That lost energy doesn’t just disappear. Your furnace or air conditioner has to work longer and harder to make up the difference. This drives up monthly bills and shortens the life of expensive equipment. Combining duct upgrades with other efficiency steps, like caulking and weatherstripping, helps close the gaps where energy escapes throughout the whole house.
Signs Your Ductwork Needs Insulation
Some rooms feel noticeably warmer or colder than others, even with the thermostat set correctly. That’s a classic sign of duct heat loss. You might also notice your system running constantly, higher utility bills, or condensation forming on ducts in humid weather.
Visible gaps, crushed sections, or exposed metal ductwork in unconditioned spaces are red flags. If your attic insulation was recently upgraded but ducts were overlooked, that’s an easy oversight worth fixing now.
Comfort, Efficiency, and Cost Savings Explained
Insulated ducts deliver air at a more consistent temperature, so your home feels comfortable in every room. Equipment cycles less often. That reduces wear and stretches its usable lifespan considerably.
Lower energy use also means lower bills, freeing up budget for other upgrades like are solar panels worth it projects or appliance replacements. The sections ahead cover R-values, materials, and where to find quality HVAC Duct Insulation Products | HVAC Wrap & Boards for your project.
Understanding R-Values and What They Mean for Ducts
What R-Value Actually Measures
R-value measures a material’s resistance to heat flow. The higher the number, the better it blocks heat from moving through it. For ducts, this matters year-round. In winter, heat escapes from warm air moving through cold spaces. In summer, unwanted heat sneaks into cool supply air before it reaches your rooms.
Manufacturers test insulation under controlled conditions to assign these ratings. A duct wrapped in R-6 insulation resists heat transfer far better than bare sheet metal, which has almost no R-value at all. Homeowners exploring r/hvacadvice – Is it worth it to insulate my ducts? often discover just how much energy escapes through uninsulated runs.
Recommended R-Values for Attics, Basements, and Crawlspaces
Recommended levels depend on where ducts run and your climate zone. Attics, often the hottest and coldest spaces in a home, typically need R-8. Unconditioned basements and crawlspaces usually call for R-6 to R-8, since temperatures swing less dramatically there.
Northeast homes face cold winters and humid summers, so many contractors recommend the higher end of these ranges. Checking energy saving tips for summer can help you understand why cooling efficiency deserves equal attention alongside heating performance.
Meeting Local and National Code Requirements
Building codes set minimum insulation standards, and these vary by jurisdiction. Many states follow the International Energy Conservation Code, which sets R-6 or R-8 minimums depending on duct location. Local amendments sometimes raise these thresholds further.
A qualified installer checks current code before recommending materials. Meeting code isn’t just about avoiding fines. It ensures your system performs efficiently and passes inspection during renovations or resale evaluations.
Types of HVAC Duct Insulation Materials
Most ducts get covered with one of three material families. Each comes in different forms, like wrap, board, or liner, and each has its own strengths. Picking the right one is part of smart projects to improve energy efficiency planning.
Fiberglass Duct Wrap and Board
Fiberglass is the most common choice. Wrap suits round ducts. Rigid board works better on flat, rectangular trunks. It resists heat well but can shed fibers if damaged.
Reflective Foil and Bubble Insulation
Foil-faced products reflect radiant heat instead of trapping it. They’re thin, easy to handle, and popular in tight crawl spaces where bulky wrap won’t fit.
Natural Fiber and Cotton Alternatives
Cotton and wool blends appeal to homeowners wanting fewer chemical irritants. They cost more but install without gloves or masks.
| Material | Common Form | Typical R-Value per Inch | Best Use |
|---|---|---|---|
| Fiberglass Wrap | Flexible roll | R-3 to R-4 | Round supply ducts |
| Fiberglass Board | Rigid panel | R-4 to R-6 | Rectangular trunk lines |
| Reflective Foil | Thin sheet | R-1 to R-3.5 | Crawl spaces, attics |
| Cotton/Natural Fiber | Batt or roll | R-3 to R-3.7 | Homes needing low-irritant options |
Many local businesses stock these options, and shoppers researching Duct Insulation online can compare thickness and facing types before buying.
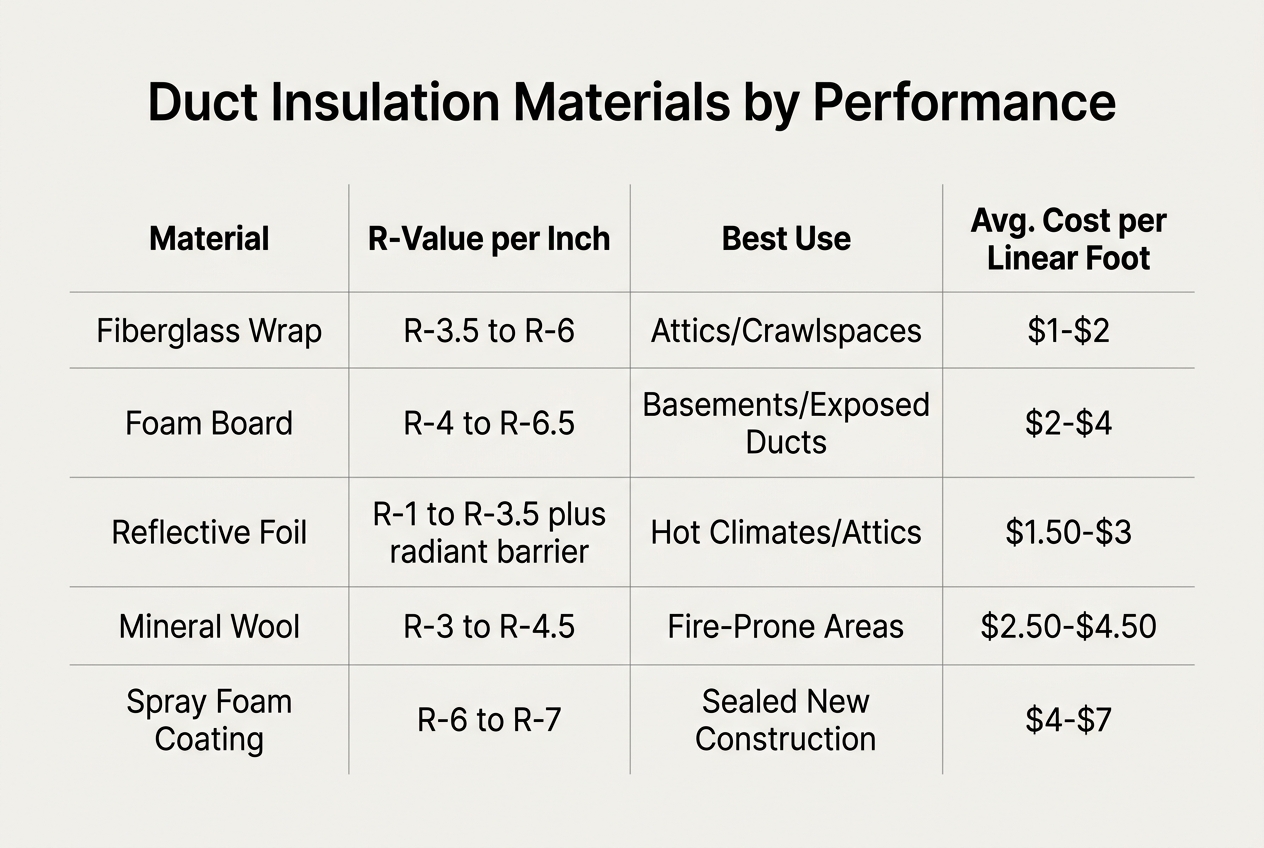
Comparing Duct Insulation Products by Performance
Duct insulation products vary widely in thickness, R-value, and how much area a roll or batt will cover. The table below lines up five common options so you can match specs to your project. This kind of comparison, similar to what you’ll find in HVAC Ducts – Pro Installer guides, helps prevent under-buying or overspending.
| Product Type | Thickness | R-Value | Typical Coverage | Moisture Resistance |
|---|---|---|---|---|
| Foil-Faced Bubble Wrap | 5/16 in | R-3.7 to R-6 | 125 sq ft/roll | Excellent |
| Fiberglass Duct Wrap | 1.5–2 in | R-6 to R-8 | 75 sq ft/roll | Fair, needs vapor barrier |
| Rigid Foam Board | 1–2 in | R-5 to R-10 | 32 sq ft/sheet | Very good |
| Mineral Wool Wrap | 2 in | R-7 to R-9 | 48 sq ft/roll | Good, resists mold |
Thickness and Coverage Area Differences
Thicker material usually means higher R-value, but it also takes up more space in tight crawlspaces. Check clearance before buying.
R-Value vs Price Trade-offs
Higher R-value products cost more per square foot. Balance budget against climate zone and duct location for the best long-term value.
Best Use Cases for Each Product Type
Foil-faced wrap suits humid basements. Rigid foam works well on exposed attic runs. Many local businesses pair duct upgrades with attic insulation or weatherstripping projects. Learn more on our about us page.
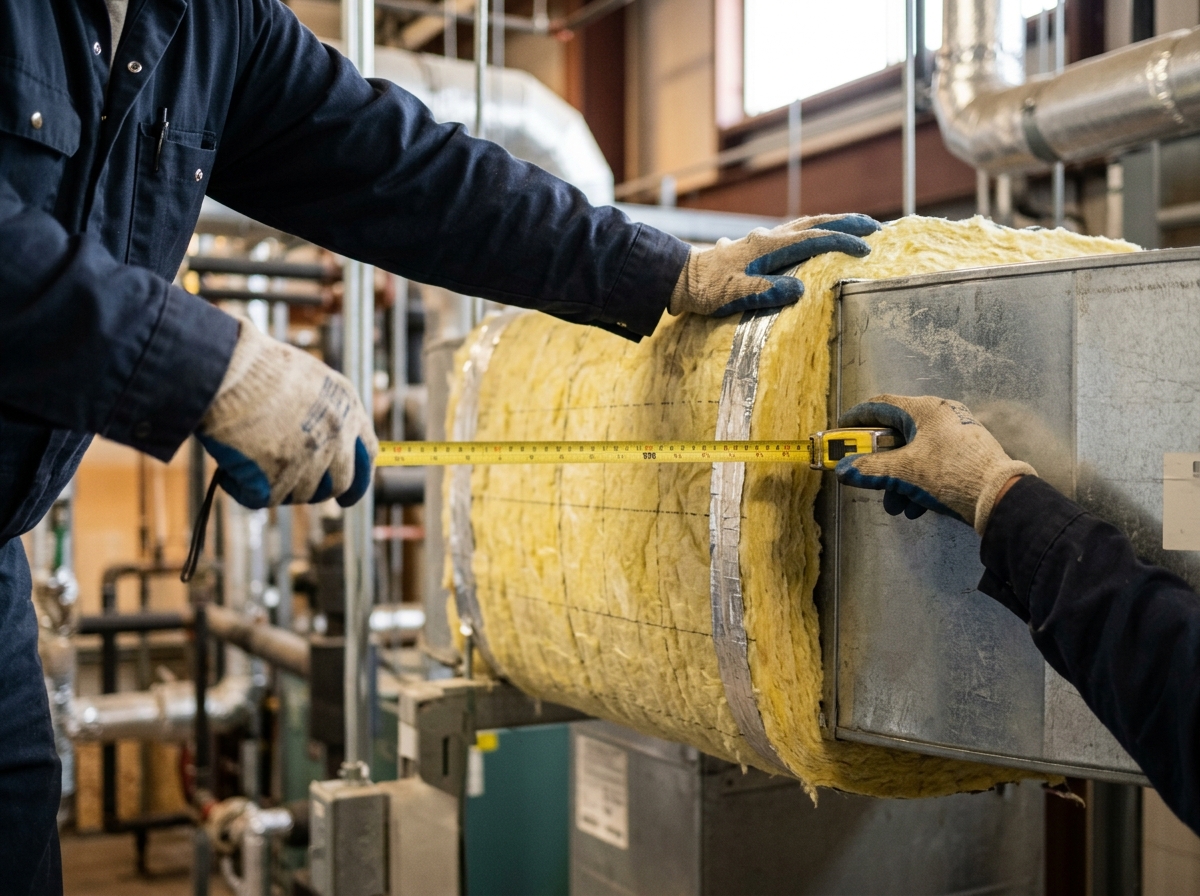
How to Measure and Calculate the Insulation You Need
Measuring Duct Length, Width, and Diameter
Start by walking your duct system from the furnace or air handler to each register. Use a tape measure to record the length of every straight run in feet. For round ducts, measure the diameter across the metal. For rectangular trunks, measure both width and height. Write each number down as you go. This step matters because accurate measurements prevent costly guesswork later. Many homeowners checking these details also review guidance like When Is Insulation Required on Air Ducts? to confirm which sections truly need coverage.
Calculating Square Footage and Buying Extra Material
Once you have your measurements, calculate the surface area of each section. For round ducts, multiply the diameter by 3.14, then multiply by the length. For rectangular ducts, add up all four sides, then multiply by the length. This gives you total square footage. Always add a waste factor of 10 to 15 percent for cutting errors and odd angles.
- Round up every measurement to the nearest half-foot to avoid running short mid-project.
- Buy an extra roll of insulation if your total square footage lands close to a full package size.
- Separate your calculations by duct type, since supply and return runs often need different R-values.
- Keep a written tally of each section so you can reorder the exact same product later.
Accounting for Bends, Joints, and Fittings
Bends, elbows, and joints demand extra material because insulation must wrap around curves without gaps. Measure the outer radius of each bend separately from straight runs. Add a few extra inches at every joint for overlap. This same careful approach applies to related work, including attic insulation and light home repair projects around ductwork. Reviewing our services can help you decide whether a professional should handle complex fittings.
Step-by-Step Duct Insulation Installation Process
Tools and Materials You’ll Need
Good prep makes the job faster and safer. Gather your supplies before climbing into the attic or crawlspace, since trips back and forth waste time and energy.
- Faced fiberglass wrap or reflective foil insulation, sized to match your duct diameter and required R-value.
- Foil-backed tape rated for HVAC use, not standard duct tape, which breaks down over time.
- A sharp utility knife and metal shears for cutting insulation and trimming excess material.
- Work gloves, safety glasses, and a dust mask, since fiberglass fibers irritate skin and lungs.
- A tape measure, marker, and flashlight or headlamp for tight, dark spaces.
- Mastic sealant and a brush for closing gaps before wrapping begins.
For deeper background on material choices, this guide to HVAC Insulation covers common product options in detail.
Preparing and Sealing Ducts Before Wrapping
Never insulate a leaky duct. Sealing comes first. Inspect every joint, seam, and connection for gaps. Apply mastic sealant generously over seams, letting it cure fully before wrapping. Skipping this step traps leaks under insulation, hiding problems that waste energy for years.
Securing Insulation with Tape and Spacer Strips
Wrap insulation snugly around the duct, keeping the vapor barrier facing outward. Overlap seams by at least two inches and seal every joint with foil tape. Spacer strips help on larger rectangular ducts, preventing compression that reduces R-value. Many local businesses recommend checking a company’s privacy policy before scheduling any in-home energy assessment.
DIY Installation vs Hiring a Professional
When DIY Makes Sense
Some jobs suit a confident homeowner. Wrapping exposed ducts in an accessible basement, where runs are straight and easy to reach, is a reasonable weekend project. Basic wrap insulation and foil tape cost little, and mistakes are easy to fix. If you already handle small tasks like light home repair or weatherstripping, duct wrapping may feel familiar.
DIY works best when ducts are short, visible, and free of tight bends. Rectangular trunk lines running along a garage ceiling, for example, are far simpler than round ducts twisting through a cramped joist bay. Good lighting and clear access matter more than tool skill.
Still, know your limits. If a project starts feeling risky or confusing halfway through, that’s a signal to stop and call for help rather than push forward.
Risks of Improper Installation
Poorly installed insulation causes real problems. Gaps left at seams let conditioned air escape, wasting energy and raising bills. Compressed insulation loses its R-value, cutting effectiveness by half in some cases. Loose vapor barriers invite condensation, mold, and rot inside wall cavities.
Crawlspaces and attics add serious risk. Low clearance, exposed nails, and unstable joists make injuries common. Attics often hit 130°F in summer, and crawlspaces may hide sharp ductwork edges or standing moisture. Falling through drywall or damaging wiring near ducts is a frequent DIY mishap.
These environments are also where professionals catch related issues, like a hidden gas leak repair need, before they worsen.
What Professional Energy Audits Add to the Process
A professional audit identifies exactly where ducts leak, where insulation is missing, and how airflow moves through the whole system. This data-driven approach often reveals problems invisible to homeowners, guiding smarter decisions than guesswork alone.
Auditors also connect duct issues to broader home performance, from attic insulation gaps to outdated appliances needing home appliance replacements. For scheduling an assessment or asking questions, homeowners can reach out through the contacts page.
Many local businesses offering these audits also handle related upgrades, like LED light bulb replacement or caulking, during the same visit, maximizing value from one appointment.
Common Mistakes That Reduce Insulation Effectiveness
Leaving Gaps or Uncovered Seams
Even top-rated insulation fails if it does not fully wrap the duct. A common error is leaving small gaps at joints, elbows, or where two pieces meet. These openings let conditioned air leak out and outside air seep in, undermining the whole system.
Uncovered seams also invite condensation and dust buildup over time. A quarter-inch gap may seem minor, but multiplied across dozens of feet of ductwork, it can cut overall performance by a noticeable margin. Sealing every seam with foil tape or mastic matters as much as the insulation itself.
Homeowners tackling several upgrades at once, like caulking and weatherstripping, often notice similar patterns. Small missed spots quietly erase the benefits of otherwise careful work.
Compressing Insulation During Installation
Insulation works by trapping pockets of air. When installers pull wrap too tight or staple it down hard, those air pockets collapse. A material rated R-6 can perform closer to R-3 once compressed, cutting its R-value nearly in half.
This mistake happens often in tight crawlspaces or attics, where space is limited and installers rush to fit insulation around obstacles. Taking time to leave proper loft, rather than cramming material into place, preserves the rated performance you paid for.
Using Indoor Materials in Outdoor or Humid Areas
Not all insulation handles moisture well. Products designed for dry, indoor spaces can absorb humidity in crawlspaces, basements, or outdoor duct runs, leading to mold and reduced effectiveness.
Outdoor and humid areas call for moisture-resistant, closed-cell materials with proper vapor barriers. Skipping this step often causes problems similar to those addressed during attic insulation upgrades, where trapped moisture silently damages materials for months before anyone notices.
For more guidance on avoiding these pitfalls, many homeowners turn to the blog for practical, seasonal maintenance tips.
Maintaining and Inspecting Insulated Ductwork Over Time
Annual Inspection Checklist
Duct insulation lasts for years, but it still needs regular checkups. Plan a full inspection once a year, ideally before summer or winter demand peaks. Attics, crawl spaces, and basements deserve extra attention since temperature swings hit hardest there. A quick visual check can catch problems before they raise energy bills.
- Look for insulation that has slipped, sagged, or pulled away from the duct seams.
- Check for moisture stains or mold spots, which signal condensation trapped under the wrap.
- Feel duct surfaces for unusual heat or cold, a sign insulation has thinned out.
- Inspect tape and seals at joints for cracking, curling, or gaps.
- Watch for chewed or torn sections caused by pests nesting in attics or crawl spaces.
- Note any rooms that feel harder to heat or cool than before.
Repairing Damaged or Worn Insulation
Small tears or loose seams often need only a patch. Fresh foil tape, new wrap sections, or re-sealed joints can restore performance quickly. This kind of light home repair is affordable and fast, similar in scope to caulking or weatherstripping work elsewhere in the house.
Knowing When Full Replacement Is Needed
Widespread moisture damage, crushed insulation, or exposed ductwork usually calls for full replacement instead of patching. If more than a quarter of the system shows wear, replacement often saves more money long term. Reviewing a contractor’s portfolio of completed duct projects can help homeowners judge quality before hiring. Consistent maintenance, paired with attic insulation upgrades, keeps energy savings steady for years.
Frequently Asked Questions About Duct Insulation
Does This Meet Building Code Requirements?
Most local codes follow standards set by the International Energy Conservation Code, which require a minimum R-6 to R-8 for ducts running through unconditioned spaces like attics or crawl spaces. New Jersey generally aligns with these baseline figures, though exact numbers depend on your municipality and the duct’s location.
Older homes with existing ductwork may be exempt from retrofit requirements, but any new installation or major renovation usually triggers code review. A permit inspector will check thickness, vapor barrier placement, and sealing quality. Skipping this step can cause problems during a home sale or insurance claim.
Warranty terms vary by manufacturer, typically ranging from 10 to 25 years, but that coverage often assumes proper installation. Expected lifespan runs 15 to 20 years under normal conditions, longer if ducts stay dry and undisturbed.
Do I Need Special Tools to Install It?
Basic jobs require a utility knife, tape measure, foil tape, and heavy gloves. Fiberglass batts need a dust mask and long sleeves, since fibers irritate skin and lungs. Rigid board insulation calls for a straightedge and sharp blade for clean cuts around fittings.
Homeowners comfortable with light home repair projects can usually handle straight duct runs. Curved sections, plenum boxes, or spray-applied foam typically need specialized equipment, including pressure sprayers, which most people don’t own. Renting or hiring becomes the practical choice there.
Many local businesses offer this service alongside related upgrades like weatherstripping or attic insulation, since crews already carry the right tools. Browsing a gallery of completed projects can help you judge whether a job fits your skill level before starting.
Can Duct Insulation Be Used Outdoors?
Standard indoor products break down quickly outside. UV rays, rain, and temperature swings degrade fiberglass and foam within a season or two. Outdoor-rated ducts need a weatherproof jacket, usually a UV-resistant polymer or metal cladding layered over the insulation core.
These exterior systems cost more upfront but last 20 years or longer when properly sealed. Rooftop or exposed runs also benefit from periodic caulking around joints to block moisture intrusion, similar to sealing techniques used elsewhere in the home.
Getting Professional Help and Energy Assistance Programs
What an Energy Audit Reveals About Your Ducts
A professional energy audit gives a full picture of where your home loses heat and cooling. Technicians use blower doors, infrared cameras, and duct pressure tests to find leaks and thin spots in insulation. These tools spot problems that stay invisible during a simple walk-through inspection.
The audit report usually ranks issues by cost and impact. Uninsulated attic ducts, gaps at joints, and crushed sections often top the list. Many audits also check attic insulation, weatherstripping, and caulking, since these areas work together with ducts to control airflow and temperature loss throughout the house.
Rebates and Assistance Programs for Insulation Upgrades
Many states offer rebates for homeowners who upgrade duct insulation, seal leaks, or replace old HVAC equipment. Income-eligible households often qualify for free or reduced-cost services, including duct sealing, insulation installation, and even appliance replacements. These programs aim to lower energy bills for families who need it most.
Some programs bundle duct work with other repairs, like gas leak repair, showerhead and aerator replacement, or LED light bulb swaps. Bundling saves money and cuts down on the number of separate visits needed to finish a home’s efficiency upgrades.
Choosing a Qualified Insulation Contractor
Look for licensed contractors with experience in duct systems, not just general insulation work. Ask for references, proof of insurance, and a written estimate before any session begins. A trustworthy contractor should explain material choices clearly, including options like the HVAC Duct Insulation Wrap | R8, 4′ x 50′ (200 Sq Ft) for basement or attic runs.
Many local businesses also handle light home repair alongside insulation projects. Reach out to your state or utility program for guidance on qualified providers near you.
If your ductwork is leaking conditioned air and driving up your bills, the team at NECINJ can help you get it sealed and properly insulated for lasting comfort. As part of Northeast Energy Conservation, Inc.’s commitment to energy savings, they offer expert energy audits alongside insulation services, and through the New Jersey Comfort Partners Program, income-eligible customers may even qualify for these upgrades at no cost. Reach out to NECINJ today to schedule an assessment and see what’s possible for your home.
