


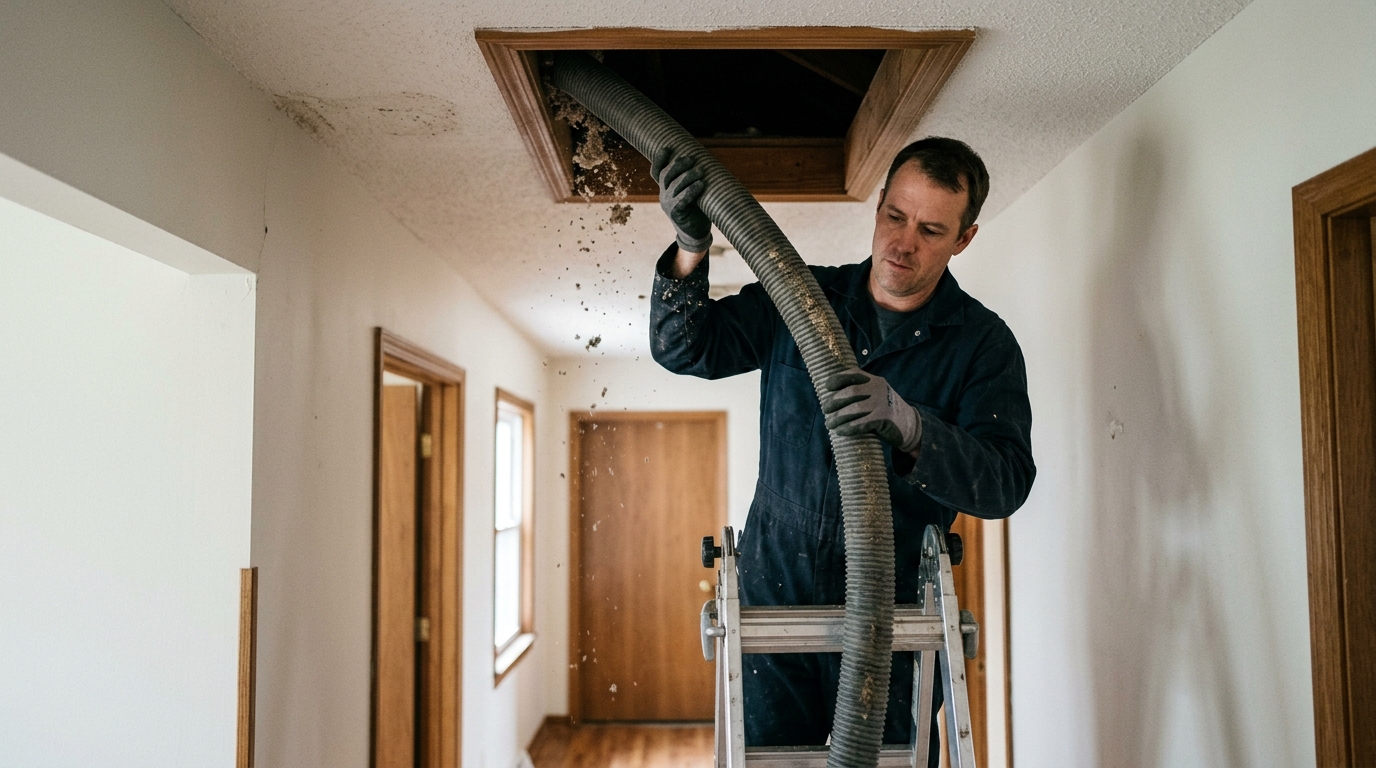
Old, contaminated attic insulation doesn’t just hurt your energy bills. It can also harbor decades of rodent droppings, mold spores, and dust that pose real health risks every time your HVAC system cycles on. Trying to remove it by hand usually stirs up these contaminants, turning a simple upgrade into a hazardous, days-long ordeal. An attic insulation vacuum, used correctly, extracts old material fast and safely while trapping airborne particles that would otherwise spread through your home. This guide breaks down how the process works, what equipment actually matters, and how NECINJ homeowners can approach removal in 2026 without risking their health or their budget.
What Is an Attic Insulation Vacuum and How It Works
Core Components of the Machine
An attic insulation vacuum is a large truck-mounted or trailer-mounted unit built around a powerful motor, a debris tank, and a set of flexible hoses. The motor drives suction through wide hoses, often 8 to 10 inches across, that reach deep into attic spaces. A separate collection bag or tank catches the removed material before it ever gets near living spaces.
Most professional units look like an Insulation Removal Vacuum used in commercial demolition work, just scaled down for residential attics. Filters inside the tank trap fine dust particles, keeping outdoor air quality in check during long jobs.
Suction vs. Blowing Function
The machine runs two ways. Suction mode pulls old, contaminated insulation up through the hose and into the collection tank, clearing loose-fill fiberglass or cellulose in minutes. Blowing mode reverses that airflow, pushing fresh insulation through the same hose system into the attic once cleanup wraps up.
This dual function means one machine handles both removal and reinstallation. Technicians just switch settings instead of swapping equipment mid-job, which saves time on a typical afternoon-long project.
Common Attic Applications
The vacuum unit itself usually stays outside, parked in a driveway or on the street, with hoses running through a window or attic vent. This keeps dust, debris, and noise outside the home instead of filling hallways or bedrooms.
Homeowners usually need this equipment after water damage, a rodent infestation, or decades of settled, worn-out fiberglass. Removing old material properly, then adding fresh attic insulation, often pairs well with other upgrades homeowners are already weighing, including whether are solar panels worth it for their roof and energy goals.
Signs Your Attic Insulation Needs to Be Removed
Not every attic needs a full clean-out. But certain warning signs mean the old material has stopped doing its job. Knowing what to look for helps homeowners act before small problems turn into bigger, costlier repairs.
Water Damage and Mold Growth
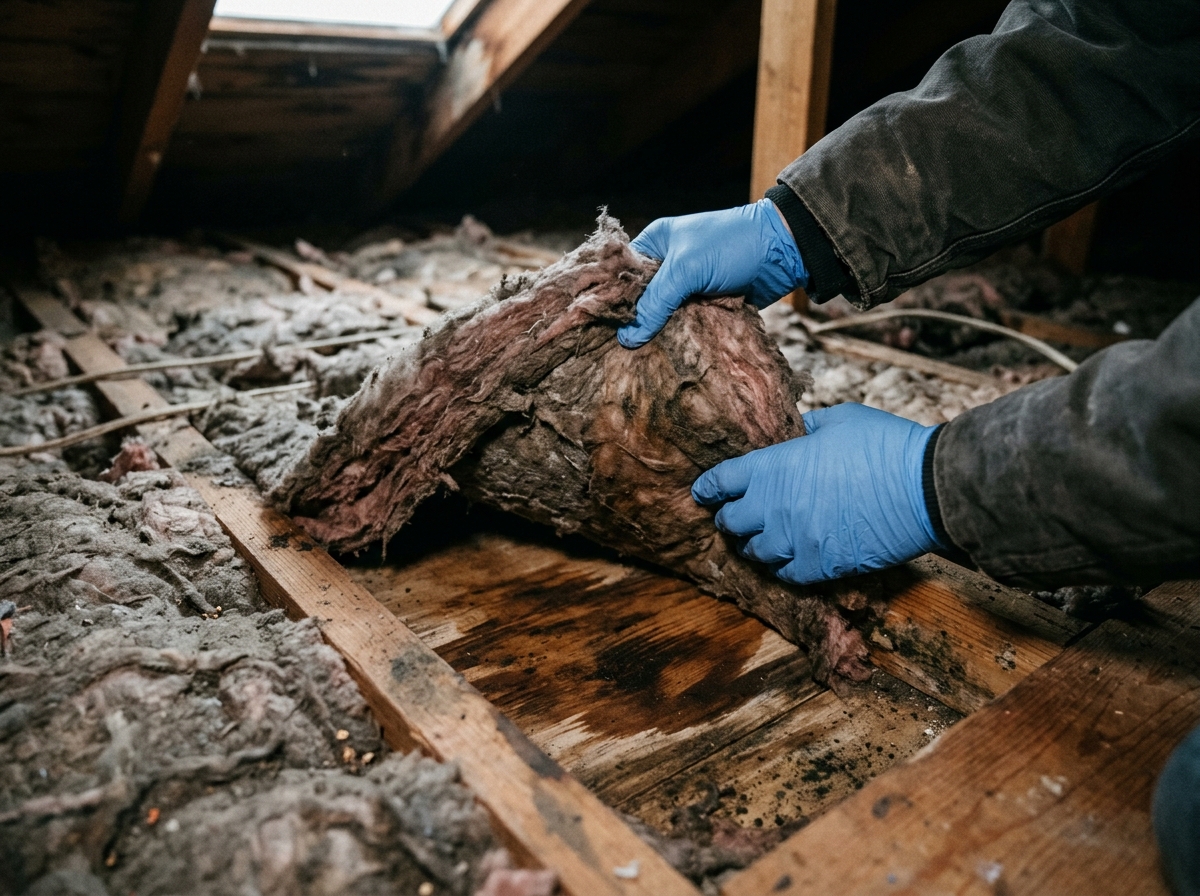
Moisture is one of the clearest red flags. Wet insulation loses its R-value almost immediately and rarely dries out on its own. Roof leaks, poor ventilation, or ice dams can leave insulation damp for months before anyone notices stains on the ceilings below.
Rodent or Pest Infestation
Mice, squirrels, and insects treat old insulation like bedding. Droppings, tunnels, and nesting debris contaminate the fibers and create health hazards that spot-cleaning simply can’t fix.
Age and Compression of Existing Material
Insulation flattens and settles over the decades, losing much of its insulating power. If you’re unsure whether your attic qualifies, this homeowner thread on how would I go about vacuuming out old blow in attic … shows just how common the question is.
- Discolored or stained insulation that suggests long-term roof leaks or condensation buildup
- Musty, sour, or ammonia-like odors coming from the attic hatch or vents
- Visible mold growth on rafters, sheathing, or the insulation surface itself
- Chewed wiring, nesting material, or rodent droppings scattered through the insulation
- Insulation that looks matted, thin, or noticeably lower than its original depth
- Rising energy bills despite no change in thermostat habits or household size
Pairing removal with other upgrades, like caulking, weatherstripping, or reviewing these energy saving tips for summer, usually produces noticeably better results.
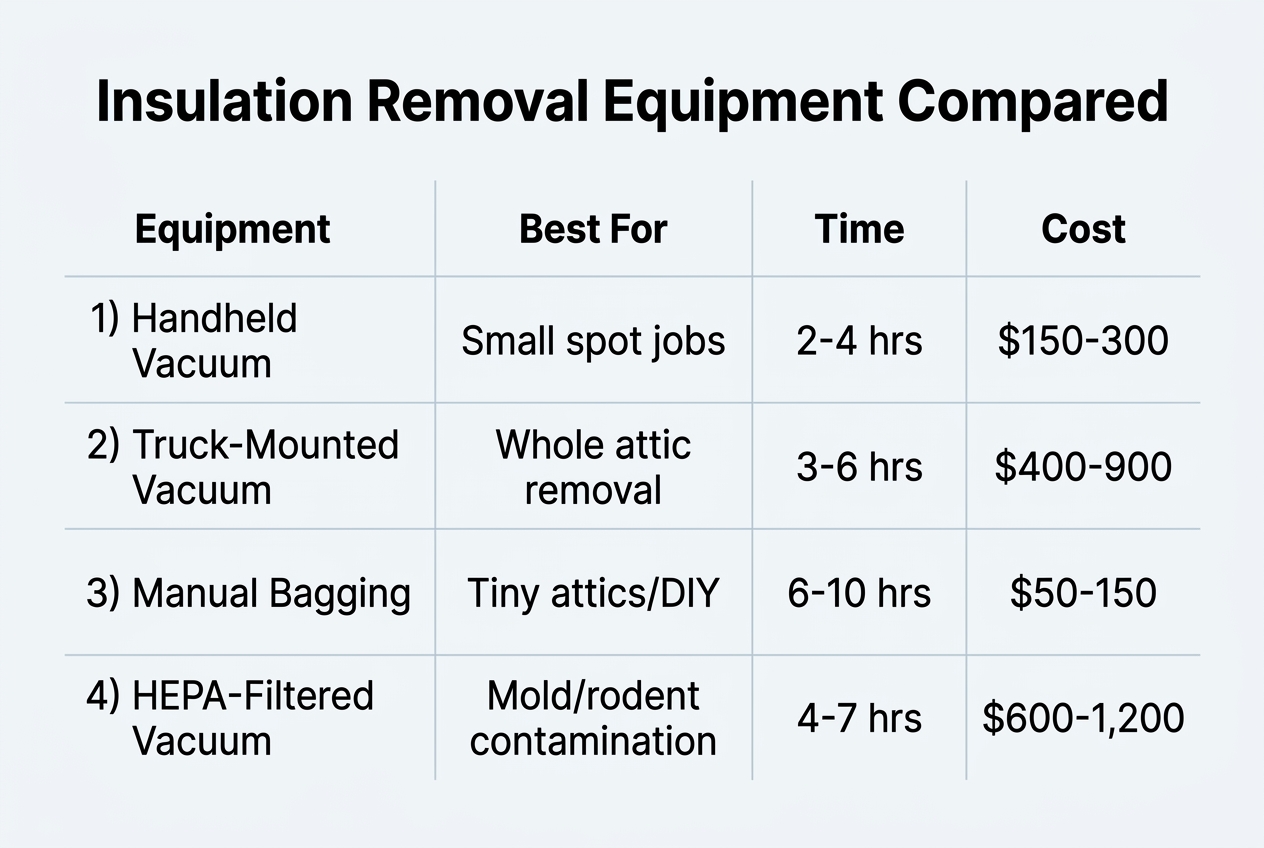
Types of Insulation Removal Equipment Compared
HEPA-Filtered Vacuums vs Standard Industrial Units
Filtration quality is what separates these two machine types. HEPA-filtered units trap particles as small as 0.3 microns, which matters a lot when cellulose or fiberglass dust fills the air. Standard industrial vacuums move debris fast but often skip fine filtration, letting irritants escape back into the attic and home. Many local businesses rent both types, but professional crews typically bring HEPA-grade equipment as a standard.
Insulation Removal Vacuums vs Blowing Machines
A removal vacuum pulls old material out through a hose into a truck-mounted collection bag. A blowing machine does the opposite, feeding fresh insulation into the attic. Mixing up the two wastes rental money fast. The table below compares typical specs and costs.
| Equipment | Primary Use | Airflow (CFM) | Typical Daily Rental |
|---|---|---|---|
| HEPA insulation vacuum | Removal, dust control | 3,000–4,500 | $250–$400 |
| Standard industrial vacuum | Bulk debris removal | 2,500–3,500 | $150–$275 |
| Blowing machine | Installing loose-fill insulation | 1,500–2,200 | $100–$200 |
| Professional crew service | Full removal and disposal | Varies by unit | $0 (included in job quote) |
Choosing Equipment Based on Insulation Type
Loose-fill cellulose vacuums up easily, while fiberglass batts often need manual cutting first. Wet or moldy insulation needs stronger suction and sealed collection bags so contamination doesn’t spread. Homeowners tackling projects to improve energy efficiency should match the equipment to the material, not just pick based on price. Anyone researching options online will find an Insulation Vacuum listed in several power ranges and price points.
Step-by-Step Attic Insulation Vacuum Process
Pre-Job Inspection and Containment Setup
Every job starts with a careful walk-through. Technicians check the attic for wiring hazards, moisture damage, and pest activity before touching anything. They seal HVAC vents and cover floor openings so dust doesn’t drift into living spaces. Plastic sheeting lines the hallways, and negative air pressure keeps particles from spreading. This setup stage often takes as long as the removal itself.
Vacuuming and Extraction Procedure
Once containment is ready, the crew feeds the vacuum hose through a window or roof access point. Powerful suction pulls loose insulation into a truck-mounted collection unit outside the home. The table below outlines a typical extraction sequence for a standard attic job.
| Step | Task | Approx. Time |
|---|---|---|
| 1 | Position hose and check suction pressure | 10-15 min |
| 2 | Extract loose-fill insulation section by section | 1-3 hours |
| 3 | Vacuum debris around joists and framing | 20-30 min |
| 4 | Inspect for missed pockets or compacted areas | 15 min |
| 5 | Final pass with brush attachment | 10 min |
Technicians work in sections, moving from the attic’s far corners back toward the access point. This keeps cleared areas from getting recontaminated.
Disposal and Site Cleanup
Collected material goes straight into sealed bags or the truck’s holding tank, never loose in the yard. Crews take down the plastic sheeting, vacuum stray fibers off the floors, and wipe down surfaces near the access point. Many local businesses bundle this service with related upgrades, listed among our services, such as attic insulation or weatherstripping. Larger residential jobs typically rely on commercial-grade Insulation Removal Vacuums for faster, cleaner extraction.
Safety Considerations During Insulation Removal
Airborne Dust and Fiberglass Particles
Old insulation sheds tiny fibers the moment it’s disturbed. Fiberglass particles can float in the air for hours, settling into lungs and irritating eyes and skin. Cellulose insulation, especially decades-old material, releases fine dust that reaches deep into the lungs with every breath.
Without proper controls, a homeowner attempting this job could inhale thousands of particles per cubic foot of air. Respiratory protection is not optional here. Coughing, throat irritation, and itchy skin are common short-term reactions, but repeated unprotected exposure raises longer-term health concerns that are easy to avoid with the right setup.
This is why removal work demands sealed equipment and proper containment, not just an open shop vac and a dust mask. A properly run session keeps particles trapped at the source instead of circulating through living spaces below the attic hatch.
Mold, Asbestos, and Contamination Risks
Attics often hide more than dusty insulation. Water stains signal hidden mold growth, which releases spores when disturbed. Homes built before 1990 may contain asbestos-laced vermiculite, a fiber that only becomes dangerous once it’s airborne and inhaled.
Rodent droppings and nesting debris are another common hazard, sometimes carrying bacteria or viruses. Before any removal starts, a careful inspection should flag these risks. Testing suspicious material is standard practice, since asbestos and mold are invisible to the untrained eye but require very different handling once confirmed.
Protective Equipment and Air Scrubbers
Full-face respirators, sealed coveralls, and gloves are the baseline gear for safe removal. Beyond personal equipment, professional-grade air scrubbers filter airborne particles down to fractions of a micron, catching what standard vacuums miss entirely.
This filtration gap explains why many local businesses invest in commercial-grade Insulation Removal Vacuum Machines for Sale instead of relying on rental units. Reading a company’s about us page can reveal whether their crews carry the right certifications for handling contaminated material safely.
Related Equipment Used Alongside Attic Vacuums
Air Scrubbers and Negative Air Machines
Attic removal jobs stir up fine particles that stay airborne long after the vacuum shuts off. Many crews add an air scrubber or negative air machine to pull that dust out of the space. These units filter air through HEPA media and vent it away from living areas. A team renting an Insulation Removal Vacuum – High Capacity Rental often pairs it with this kind of filtration for cleaner results.
Dryer Vent and Duct Cleaning Tools
Attic work frequently uncovers clogged dryer vents or dusty ductwork nearby. Technicians sometimes bring specialized brushes and vacuum attachments built for these narrow spaces. Clearing them lowers fire risk and improves airflow at the same time.
Specialty Extraction for Smoke, Dust, and Fumes
Some attics hold more than old fiberglass. Fire damage, rodent waste, or chemical residue call for tools built for tougher jobs. The equipment overlaps quite a bit here, since the same suction principles apply across different contaminants.
- Smoke and soot extractors use finer filters to trap microscopic particles left after a fire.
- Fume extraction units help remove fumes from adhesives, sealants, or old insulation backing materials.
- Mercury recovery vacuums handle rare cases involving broken thermostats or older fluorescent fixtures.
- Odor-control attachments pair with negative air machines to manage lingering smells during the session.
- Combination units allow one machine to switch between dry debris and damp residue as needed.
Homeowners juggling several projects at once, like caulking gaps or scheduling light home repair, should review a provider’s privacy policy before sharing home details for scheduling.
DIY Rental vs Hiring a Professional Service
Cost and Time Investment of DIY Rentals
Renting a vacuum from a hardware store looks cheap at first glance. Daily rental rates often run $80 to $150, plus fuel or hose attachments. But most homeowners underestimate the job. A single attic can take six to ten hours for someone without experience, versus two or three hours for a trained crew.
Add in disposal bags, protective gear, and a truck rental for hauling debris, and the “savings” shrink fast. Many people end up spending a full weekend on a task professionals finish before lunch.
Risks of Improper Removal Techniques
Attic insulation vacuums are powerful machines. Rental units tend to be smaller and less efficient than professional-grade equipment, so clogged hoses and repeated stops are common. Homeowners also risk stepping through ceiling joists, damaging wiring, or disturbing vermiculite that may contain asbestos.
Without proper filtration, dust and debris can spread into living spaces. That creates respiratory hazards for anyone in the home, especially children or people with asthma.
Benefits of Professional-Grade Service
A dedicated provider brings commercial-strength vacuums, proper containment bags, and safe disposal methods. This matters because insulation debris often counts as construction waste with specific disposal rules attached. Many local businesses also carry liability coverage, which protects homeowners if damage occurs during the session.
Professionals often catch related issues too, like gaps needing caulking or weatherstripping, or outdated fixtures ready for LED light bulb replacement. Before deciding, homeowners can review contacts for a provider to compare options and ask detailed questions about scope and safety.
What to Expect from a Professional Insulation Removal Visit
Initial Assessment and Energy Audit
Most visits start with a full energy audit, not just a quick peek into the attic. A trained technician checks insulation depth, looks for moisture stains, and tests for air leaks around lights, pipes, and the attic hatch. This step matters, because removal without context can waste money.
The audit often turns up related problems. Gaps around recessed lighting, missing weatherstripping, or poor caulking around vents can undo the benefits of new insulation. A good provider explains findings in plain terms, then builds a removal and reinsulation plan around actual attic conditions, not guesswork. You can read more detailed breakdowns of this process on the company’s blog before your visit.
Equipment and Crew on Job Day
A typical crew includes two to three technicians and an industrial-grade vacuum unit with a hose reaching 100 feet or more. One person runs the machine from inside the attic; another manages the truck-mounted collection tank outside. Expect a written estimate beforehand, covering square footage, insulation type, and estimated job hours.
Scheduling usually happens within one to two weeks of the estimate. Crews protect flooring, seal work areas with plastic sheeting, and set up negative-air ventilation to control dust. Most residential jobs finish in four to eight hours, depending on attic size and insulation depth.
Post-Removal Insulation Upgrade Options
Once the old material is gone, technicians often recommend upgrades like blown-in cellulose or fiberglass, paired with sealing work around ductwork and fixtures. Many homeowners bundle this with LED light bulb replacement or showerhead and aerator swaps for broader energy savings.
Results show up fast. Homeowners typically notice better temperature balance within days and lower utility bills the following month, especially once new attic insulation meets current R-value recommendations for the region.
Cost Factors and Getting an Accurate Quote
Factors That Influence Removal Pricing
Removal costs depend on several details unique to your home. Square footage drives the base price, since larger attics need more time and equipment. Contamination level matters too. Insulation with heavy rodent droppings or mold costs more to remove than clean, dry material. Accessibility plays a role as well, since cramped crawl spaces or steep rooflines slow the work down.
Requesting a Detailed Quote or Estimate
Ask for a written estimate before scheduling any work. Quotes vary based on material type, since blown-in cellulose removes differently than fiberglass batts. Site conditions, like the distance from the truck to the attic hatch, also affect the final number. A trustworthy provider inspects the space first instead of quoting blindly over the phone. You can review examples of completed projects in a company’s portfolio to get a sense of typical scope and results.
Rebates and Assistance Programs for Eligible Homeowners
Several programs help offset costs for qualifying households. Consider these options when budgeting:
- State-run energy assistance programs that cover insulation removal and replacement for income-eligible homeowners.
- Utility company rebates offered when removal is paired with new attic insulation installation.
- Financing plans that spread payments over several months instead of one lump sum.
- Bundled service discounts when combined with weatherstripping or caulking work done the same day.
- Free or reduced-cost audits that identify which upgrades qualify for additional savings.
Reinsulating After Removal: Best Practices
Choosing New Insulation Material
Removal always comes before reinsulation. Old, contaminated, or compacted material has to go first. Otherwise new insulation sits on top of hidden moisture, mold, or pests, and the problem comes right back within months. A clean attic gives fresh material a solid, healthy base to hit its full rated value.
Homeowners typically choose between blown-in cellulose, fiberglass batts, or spray foam. Cellulose works well for irregular attic spaces and offers decent soundproofing. Fiberglass batts are budget-friendly and easy to fit between standard joists. Spray foam costs more but seals air leaks while insulating, cutting down the need for separate caulking or weatherstripping later.
Browse a project gallery to compare finished attics and see how each material looks once it’s installed correctly.
Achieving Recommended R-Values
Most northeastern homes need an R-value between R-49 and R-60 in the attic. Older homes often fall well below this, sometimes sitting at R-19 or less, wasting real heating and cooling energy every season.
Reaching proper depth matters just as much as material choice. Cellulose typically needs 14 to 17 inches for R-49, while fiberglass batts may need a bit more depth to hit the same rating. A post-installation depth check confirms coverage is even and meets the target across the whole attic floor.
Long-Term Energy Savings Benefits
Properly insulated attics can cut heating and cooling costs by 10 to 15 percent a year. Paired with LED light bulb replacement and updated home appliance replacements, whole-home efficiency improves even further.
Many local businesses now bundle insulation upgrades with small repairs, since a tight, well-insulated attic supports every other energy improvement in the house for years to come.
If your attic is due for a proper insulation vacuum and clean-out, the team at NECINJ (Northeast Energy Conservation, Inc.) can help you handle it the right way, starting with a thorough energy audit to see exactly where your home is losing efficiency. They also participate in the New Jersey Comfort Partners Program, offering free services to income-eligible households, so cost doesn’t have to stand between you and a healthier, better-insulated attic. Reach out to NECINJ today to book your audit and take the next step toward a more comfortable, energy-efficient home.
