


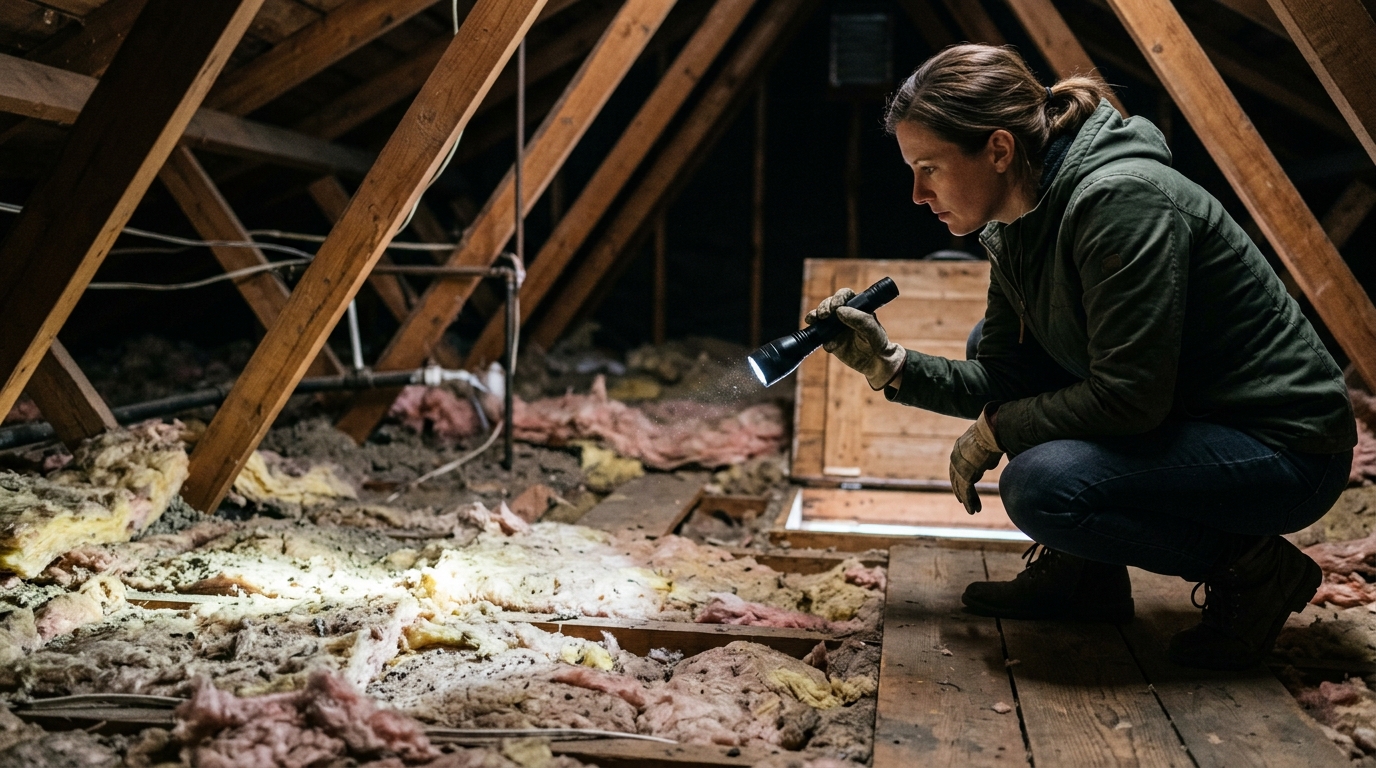
Peel back the boards in most attics built before the 2000s, and you’ll find a patchwork of materials that homeowners rarely think about until a heating bill spikes or a renovation forces the issue. Identifying old attic insulation types matters because some, like vermiculite, may carry asbestos risks. Others have simply degraded to the point of near-uselessness after decades of settling, moisture exposure, and pest activity. This guide walks NJ homeowners through recognizing what’s actually overhead, understanding the performance gap between yesterday’s materials and today’s standards, and making an informed decision about upgrading before another costly season passes.
Why Your Attic Insulation Deserves a Closer Look
Signs Your Attic May Need Attention
Some clues are easy to spot. Uneven room temperatures, ice dams along the roofline, and rooms that feel drafty in winter all point to a struggling attic. If your energy bills keep climbing despite normal usage, insulation is often the hidden cause.
A quick attic peek can reveal more. Thin, compressed, or discolored material means it isn’t doing its job. Visible daylight through the roof boards or damp, matted patches are also warning signs worth taking seriously.
Pests, musty smells, and dusty residue near vents can signal old materials breaking down. These small details matter, especially in homes built before modern insulation standards existed.
How Insulation Age Connects to Energy Loss
Insulation doesn’t last forever. Over decades, it settles, compresses, and loses R-value, the measure of how well it resists heat flow. Weaker R-value means your furnace and air conditioner work harder, pushing bills higher every season.
This is especially true in older homes, where insulation may be 30, 40, even 60 years old. Some of these materials are no longer considered safe by today’s standards. Reviewing resources like Types of Old Insulation Found in Canadian Homes can help homeowners recognize outdated products before assuming they’re harmless.
Understanding this connection sets the stage for the rest of this guide, including practical energy saving tips for summer and how to decide when replacement makes sense.
Old Attic Insulation Types You’re Likely to Find
Attics built or upgraded before the 2000s often mix several insulation types. Knowing the basics of each helps you plan your next move before starting any projects to improve energy efficiency.
Loose-Fill and Blown-In Materials
Loose-fill insulation looks like loose granules or fluffy fibers scattered across joists. It was popular because installers could blow it into tight spaces quickly.
- Cellulose loose-fill appears gray, shredded, and paper-like, often made from recycled newspaper.
- Fiberglass loose-fill looks pink, yellow, or white and feels lightweight and fluffy.
- Older loose-fill may have settled unevenly, leaving thin spots near the eaves.
- Some bags used decades ago contained additives now considered outdated for safety reasons.
Batt and Roll Fiberglass
Batt insulation comes in pre-cut rectangular sections, usually pink, yellow, or white. Rolls look similar but come in long, continuous strips.
- Batts often show a paper or foil backing that acts as a vapor barrier.
- Compressed or gapped batts signal poor original installation.
- Discoloration can point to past moisture problems or roof leaks.
Rock Wool and Mineral Wool
Mineral wool feels dense, slightly heavier than fiberglass, and ranges from gray to brownish in color. It was common in homes built before 1970. If you’re unsure what you’re seeing, this guide on Type of Attic Insulation? – Interior Inspections offers helpful visual comparisons.
What Is Vermiculite Insulation and Why It Matters
How to Recognize Vermiculite
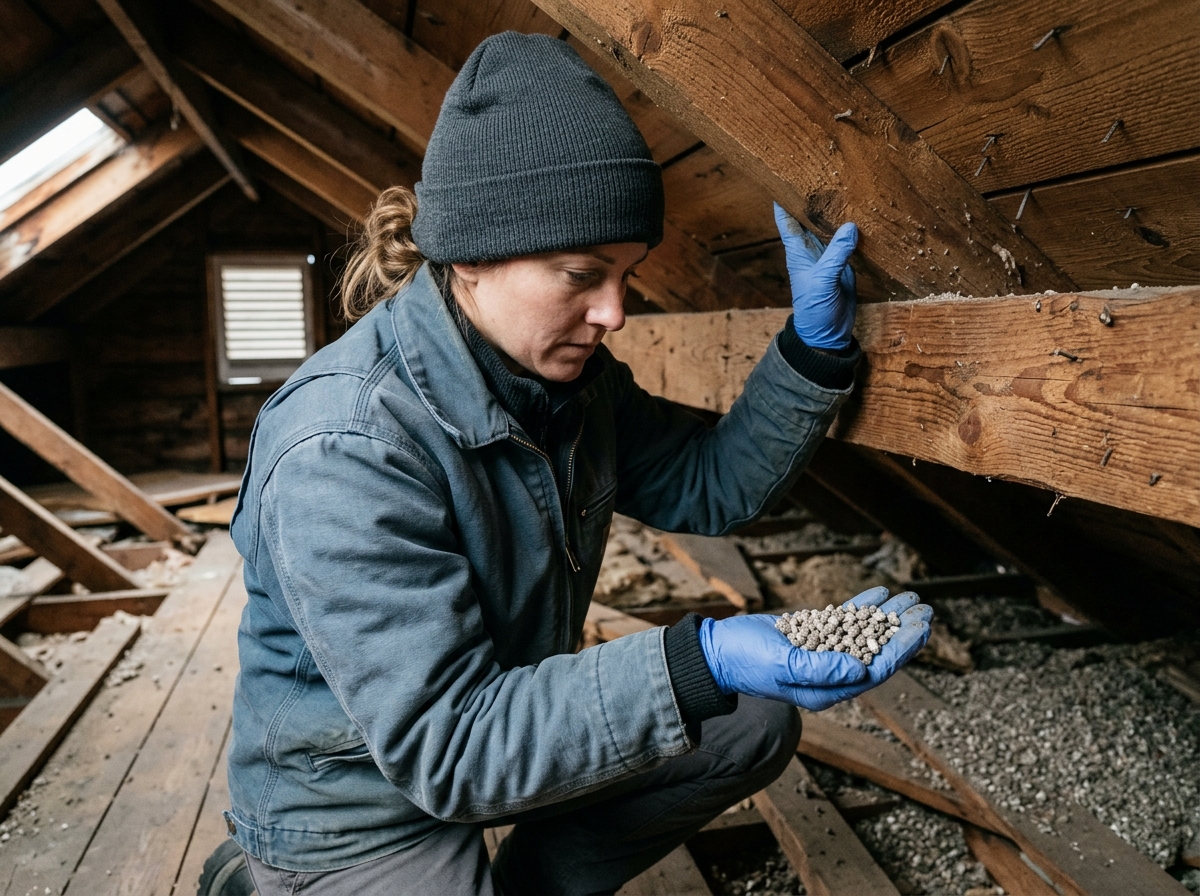
Vermiculite insulation looks like small pebbles poured loosely between attic joists. The pieces are shiny, gray-brown, and sometimes have a slight golden shimmer when light hits them. It often gets mistaken for gravel or small pieces of mica.
Unlike batts or blown cellulose, vermiculite pours and settles unevenly, leaving gaps and low spots. Homeowners planning any upgrade should first read Choosing the Right Types of Attic Insulation for Your Home to understand how this older material differs from modern products before deciding what comes next.
The Asbestos Connection
Vermiculite was widely installed from the 1940s through the 1980s. Most of it came from a single mine in Montana that was contaminated with asbestos fibers. Disturbing the pebbles can release these fibers into the air, creating a serious health hazard.
Never remove or disturb vermiculite yourself. Even sweeping or bagging it can send fibers airborne. Testing and safe removal require trained specialists, not a weekend project. Many homeowners eventually explore other upgrades, like whether are solar panels worth it once the attic is safe and properly insulated again.
Other Hazardous Materials Hiding in Older Attics
Asbestos Beyond Vermiculite
Vermiculite isn’t the only asbestos risk overhead. Older homes often used asbestos-wrapped materials near attic insulation, and disturbing them releases dangerous fibers. A qualified inspector can help you sort this out safely; read 3 Common Insulation Materials Used in Old Homes for more background on what installers used decades ago.
- Pipe insulation wrapped in white or gray asbestos-cement jacketing, often crumbling near seams and joints.
- Old ductwork sealed with asbestos tape or paper-based wrap that flakes when touched.
- Furnace flue insulation packed with asbestos fibers, sometimes hidden beneath loose fill.
- Electrical wiring coated in asbestos cloth insulation, common in homes built before 1975.
Chemical and Biological Hazards
Not every attic hazard is mineral-based. Urea-formaldehyde foam insulation (UFFI), popular in the 1970s, can off-gas formaldehyde as it ages and breaks down. Rodent droppings and mold-damaged insulation create separate health risks, including respiratory irritation and allergic reactions. These issues often surface during broader home evaluations alongside our services like attic insulation upgrades, weatherstripping, and caulking.
- Yellowed, brittle foam insulation with a lingering chemical odor, signaling degrading UFFI.
- Insulation matted with rodent droppings, nesting material, or gnaw marks throughout the attic floor.
- Dark, damp patches signaling mold growth from roof leaks or poor ventilation.
Comparing Old Attic Insulation Types Side by Side
Material-by-Material Specs
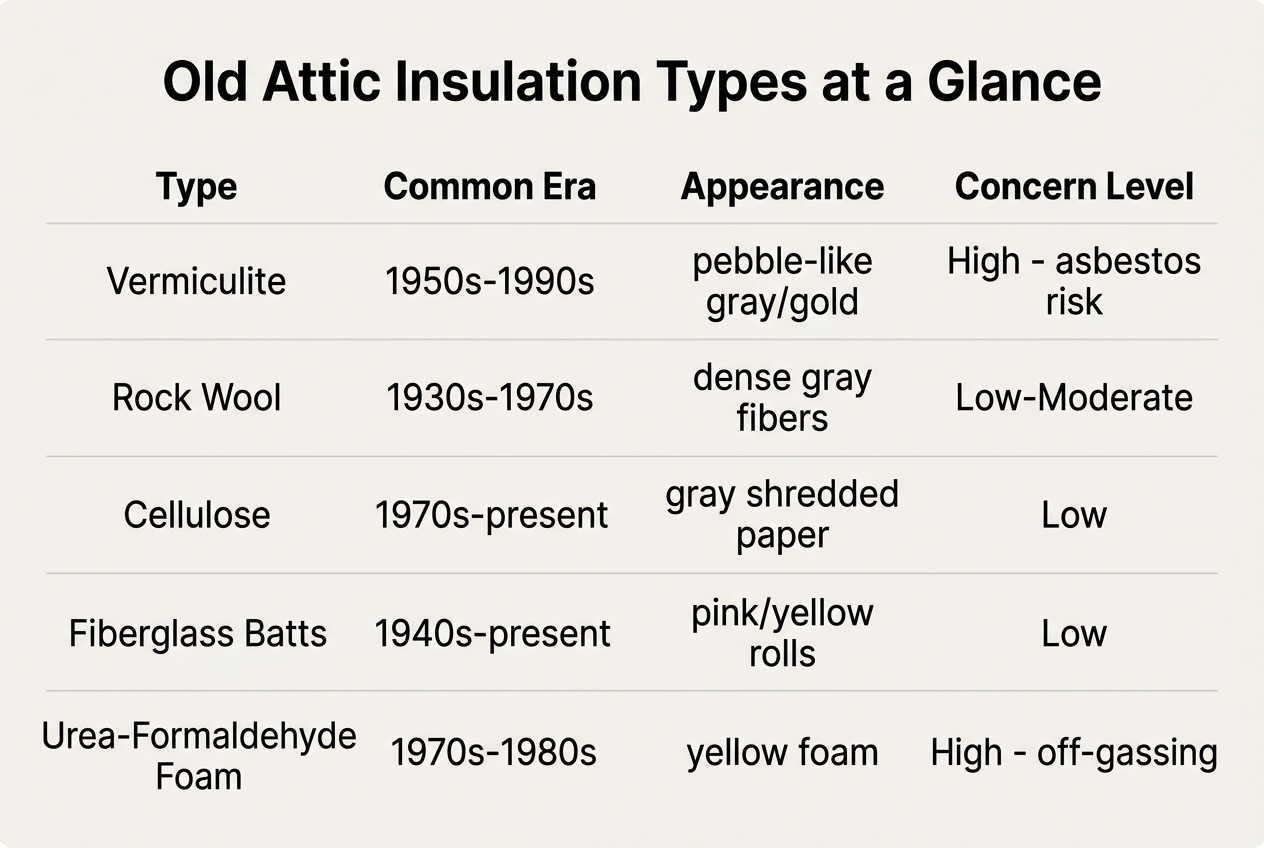
Every insulation era left behind clues. The table below lines up the most common materials by when they were installed, how well they insulate, and what risks they carry. Homeowners asking What is the old insulation material in my attic? often start here before calling in help.
| Material | Common Era | R-Value per Inch | Known Risks |
|---|---|---|---|
| Vermiculite | 1920s–1990 | 2.13 | Asbestos contamination |
| Loose-fill cellulose | 1930s–1970s | 3.1–3.7 | Fire risk if untreated, settling |
| Rock wool (mineral wool) | 1940s–1970s | 2.8–3.5 | Dust irritation, heavy weight |
| Fiberglass batts | 1950s–present | 2.9–3.8 | Skin irritation, gaps if poorly fitted |
| Urea-formaldehyde foam | 1970s–1980s | 4.0–4.5 | Off-gassing, shrinkage cracks |
R-Value and Performance Differences
Higher R-value per inch means better heat resistance. Foam and cellulose often outperform old fiberglass batts, but depth matters more than material alone. Thin, settled insulation underperforms regardless of type. Use this table as a quick-reference tool, then confirm findings with a proper inspection, similar to what’s outlined in about us, before deciding on repairs or full replacement.
How to Identify the Insulation in Your Own Attic
DIY Visual Checks You Can Safely Do
Start with a flashlight from the attic hatch. Look before you step inside. Note the color, texture, and depth of the material without touching it. Loose-fill fibers, pink batts, or gray-white pebbles all tell a different story about age and origin.
Photograph what you see from a safe distance. Measure depth with a ruler held near the opening, not by walking across joists. Check if insulation looks disturbed, crushed, or discolored, since that suggests moisture or pest activity worth mentioning to a repair technician handling light home repair around the house.
Avoid stirring dust. If the material looks loose, pebble-like, or shiny with mica flecks, stop looking and back away. That visual alone is enough reason for caution before any closer inspection.
When to Call a Professional Instead
Call a professional if you spot loose gray-gold pebbles, unknown loose-fill, or damaged batts. A trained inspector can test samples safely and recommend next steps for your attic insulation.
Home age offers clues too. Houses built before 1990 often used materials now considered outdated or hazardous. Renovation records, old receipts, or previous contractor notes help specialists date the material accurately. Before scheduling anyone, review a company’s privacy policy if you’re sharing home details online.
Many local businesses also bundle inspections with related checks, like weatherstripping, caulking, or gas leak repair, giving homeowners a fuller picture of overall home safety in one visit.
Should You Replace Old Insulation? Weighing the Decision
Reasons to Replace Now
Some conditions make removal the safer, smarter choice. Suspected vermiculite, water damage, pest infestation, or mold all point toward full replacement rather than covering the problem up. Removal costs more upfront but resets your attic to a clean, healthy baseline.
Reasons You Might Wait or Encapsulate
If old insulation is dry, intact, and simply thin, adding a new layer on top often makes more sense than tearing it out. Encapsulation seals questionable material in place, avoiding disturbance risks. The table below compares your three main paths.
| Approach | Typical Cost | Safety Consideration | Energy Benefit |
|---|---|---|---|
| Full removal | $1,500–$4,000 | Highest risk during disturbance; needs pros | Best long-term performance |
| Encapsulation | $800–$2,200 | Low risk if sealed properly | Moderate improvement |
| Add new layer | $600–$1,800 | Minimal disturbance | Good, if base layer is sound |
| Do nothing | $0 | Ongoing exposure risk possible | No improvement |
Still unsure which route fits your attic? Reaching out through contacts connects you with guidance before you spend a dollar.
Modern Insulation Options Worth Considering
Spray Foam and Cellulose Advantages
Spray foam seals gaps and insulates in one step. It expands to fill cracks around wiring, pipes, and framing. Closed-cell versions offer high R-values in tight spaces, which matters in older homes with shallow rafters.
Blown-in cellulose is another strong option. Made from recycled paper treated with fire retardant, it settles into odd corners better than old batts ever could. It’s also budget-friendly compared to spray foam, making it popular for whole-attic makeovers.
Upgraded fiberglass batts have improved too. Newer products resist moisture better and install with fewer gaps than decades-old versions. Many homeowners pair batts with cellulose for layered coverage and better performance overall.
Combining Insulation Upgrades with Air Sealing
Insulation alone won’t fix a drafty attic. Air sealing closes the small leaks that let heated or cooled air escape. Caulking around chimneys and weatherstripping attic hatches make a noticeable difference in comfort and cost.
Pairing air sealing with fresh insulation gives the best results. Sealed, insulated attics reduce strain on furnaces and air conditioners, often lowering utility bills within the first season. For more energy-saving tips, homeowners can browse this blog for practical guidance and project ideas.
What an Insulation Upgrade Project Involves
Most upgrades follow a predictable sequence. Knowing each step helps you plan your budget and schedule before crews arrive.
Step 1: Energy Audit and Inspection
A trained technician checks attic depth, moisture levels, and air leaks. This energy audit often uncovers related issues, like gaps needing caulking or weatherstripping around attic hatches.
Step 2: Removal or Safe Encapsulation
Contaminated or damaged material gets bagged and removed, or sealed in place if disturbance risks are high. This decision depends heavily on what the inspection found.
Step 3: Installing New Insulation and Sealing
Crews air-seal penetrations, then install new material to the recommended R-value. Many projects wrap up with LED light bulb replacement in fixtures exposed during the work. You can review completed jobs in this portfolio to see typical results.
| Phase | Typical Duration | What Happens | Homeowner Involvement |
|---|---|---|---|
| Audit | 1–2 hours | Inspection, blower door test, photos | Answer questions, allow attic access |
| Removal | Half day | Bagging, vacuuming old insulation | Vacate work area |
| Sealing | 2–4 hours | Caulking, weatherstripping gaps | None required |
| Installation | 1 day | Blowing or laying new insulation | Confirm access points |
| Final check | 30 minutes | Depth measurement, cleanup review | Walkthrough sign-off |
Saving Money on Your Attic Insulation Upgrade
Available Rebates and Incentive Programs
Replacing old insulation costs less than most homeowners expect. Utility companies and state agencies offer rebates that cover a real chunk of the project. Some programs pay a flat amount per square foot. Others reimburse a percentage of total costs, often several hundred dollars or more.
These incentives usually bundle with other upgrades. A single visit might include weatherstripping, caulking, and LED light bulb replacement alongside insulation work. Combining projects stretches your rebate dollars further and reduces overall labor costs.
Before starting, check current offers. Programs change yearly, and many local businesses can walk you through paperwork so you don’t miss a deadline or leave money unclaimed.
Qualifying for No-Cost or Reduced-Cost Upgrades
Income-eligible households often qualify for free insulation upgrades. The New Jersey Comfort Partners Program is a strong example. It provides no-cost energy improvements to qualifying residents, including attic insulation, air sealing, and sometimes appliance replacements.
Eligibility typically depends on household size and income level, similar to other utility assistance programs. An energy audit usually kicks off the process, identifying which upgrades will help most.
Past project photos, including a gallery of completed attic work, show what full-service upgrades look like. Seeing real results helps homeowners understand the scope before committing to an assessment.
Getting Professional Help for Your Attic
What Happens During a Home Energy Assessment
A home energy audit starts with a walkthrough of your entire house, not just the attic. A trained technician checks insulation depth, looks for gaps around the attic hatch, and inspects ductwork and wiring for damage. Many assessments include a blower door test, which measures air leakage throughout the home. This helps pinpoint drafty spots that waste energy.
The session usually covers more than insulation. Technicians often note whether caulking or weatherstripping is missing around windows and doors, check if old appliances need replacing, and flag any gas leak repair needs for safety. You’ll typically receive a written report ranking problem areas by priority, plus rough cost estimates. This gives you a clear roadmap instead of guesswork before spending money on upgrades.
Questions to Ask Before Hiring a Contractor
Before signing anything, ask how long the contractor has worked with older homes specifically. Attics built before 1990 often hide surprises, so experience matters. Request references, proof of insurance, and a written estimate that lists materials, R-values, and labor costs separately. Ask whether they test for hazardous materials before removal begins.
It’s also smart to ask how they’ll handle existing insulation removal and disposal, plus what warranty covers the finished work. If you’re still unsure what’s currently overhead, this Wondering what kind of insulation is in my attic. House i… thread shows how other homeowners approached similar questions. A qualified pro should welcome your questions, not rush past them.
Frequently Asked Questions About Old Attic Insulation Types
Is It Safe to Stay in the House During Removal?
In most cases, yes. Safety depends on what’s being removed and how it’s contained. Crews sealing off the attic and using proper ventilation reduce risk to living spaces below. If vermiculite is suspected, extra caution matters; read Old Attic Insulation? How to Spot Vermiculite and What to… before assuming it’s harmless.
- Sealed work zones keep dust and fibers from drifting into bedrooms or kitchens during the job.
- Households with young children or pets often step out for a few hours as an extra precaution.
- People with asthma or respiratory sensitivities should ask about ventilation and containment beforehand.
- Reputable crews use HEPA vacuums and negative-air setups to control airborne particles.
- Windows and vents get checked afterward to confirm nothing settled where it shouldn’t.
How Long Does an Insulation Upgrade Take?
A typical attic job takes one day, sometimes two if hazardous material removal is involved. Timing depends on attic size, insulation type, and access. Many local businesses schedule related fixes, like weatherstripping or caulking, during the same visit to save homeowners a second appointment. Confirming the timeline upfront helps you plan around the work.
If you’re unsure what’s hiding in your attic or how it’s affecting your energy bills, the team at NECINJ can help you find out. Northeast Energy Conservation, Inc. offers expert energy audits and insulation services, and through the New Jersey Comfort Partners Program, income-eligible customers may even qualify for these services at no cost. Reach out to NECINJ today to book an audit and take the first step toward a more comfortable, energy-efficient home.
