


If you’re standing in a home improvement store staring at pink batts, wondering whether r30 insulation is really right for your attic or floor, you’re not alone. Pick the wrong R-value and you could quietly lose hundreds of dollars a year in wasted energy—while your rooms stay uncomfortably drafty. The confusion makes sense. Manufacturers, contractors, and online forums toss around R-values without explaining what they mean for your climate, your budget, or your particular space. This guide clears that up. You’ll learn what R30 insulation actually delivers, what it costs installed in 2026, and how to get it right the first time, whether you hire a pro or do it yourself.
Understanding R30 Insulation and Why It Matters
What Does the ‘R’ in R-Value Mean
The letter “R” stands for thermal resistance. It measures how well a material slows heat flow. A higher number means better resistance to heat moving through it. That matters in winter, when heat wants to escape your home, and in summer, when it wants to force its way in.
Labs measure R-value under controlled conditions. Testers track how much heat passes through a material of a set thickness over time. That result becomes the standardized rating printed on every roll or batt, like an R- 30 Unfaced Fiberglass Insulation Roll 15 in. x 25 ft.….
Thicker or denser materials generally score higher. Fiberglass, cellulose, and foam each reach different R-values at different depths. That affects both cost and how much space you need for installation.
How R30 Compares to Other Common R-Values
R30 sits in the middle of the residential range. Basements and some walls may only need R13 to R19. Attics in colder climates often call for R38 to R49. R30 hits a practical sweet spot for many attics, balancing performance, cost, and available depth.
Building codes across the Northeast often use R30 as a baseline for attic floors in moderate climates. It’s become a common benchmark because it delivers solid energy savings without the extra material and labor of higher ratings. Homeowners upgrading from older, thinner insulation frequently pick R30 as an affordable, meaningful step up.
Signs Your Home Needs Better Insulation
Uneven room temperatures, drafty floors, and rooms that never feel quite right are classic red flags. Rising heating and cooling bills, with no change in usage, often point to failing insulation. Ice dams along the roof edge suggest heat is escaping through the attic too.
Poor insulation forces furnaces and air conditioners to work harder, which shortens their lifespan. Pair insulation upgrades with weatherstripping, caulking, and maybe a look at whether are solar panels worth it for a fuller energy plan. Small comfort complaints today often signal bigger losses tomorrow.
How Many Inches Deep Is R30 Insulation
Fiberglass Batt Thickness
Standard fiberglass batts reach R30 at roughly 8.25 to 10 inches, depending on the manufacturer. Higher-density batts pack more fiber into less space, hitting R30 in as little as 8 inches. Standard-density batts usually need closer to 10 inches for the same rating.
Product labels list the exact thickness needed, so check before you buy. The Owens Corning Unfaced R30 batt, for example, is built for standard attic joist spacing, with rated thickness printed right on the packaging.
Blown-In and Loose-Fill Depth
Loose-fill fiberglass usually needs 12 to 13 inches to reach R30. Cellulose is denser, so it typically only needs 8 to 9 inches for the same rating. Manufacturer depth charts show the initial fill height plus a slightly higher number, since loose-fill settles over time.
Settling can shrink depth by 10 to 20 percent within the first year. A rafter marked at 12 inches might drop to 10 inches once the fibers compact. That’s why installers often add extra material upfront, so the settled depth still hits the R30 target years down the road.
Why Compression Reduces Effectiveness
Depth alone doesn’t guarantee full performance. Compressed insulation loses R-value because the air pockets that trap heat get squeezed out. A 10-inch batt crammed into a 6-inch space performs more like R19 than R30.
This shows up most in tight attic corners or joist bays crowded with wiring. If you’re tackling a broader efficiency upgrade, insulation, weatherstripping, and seasonal fixes like energy saving tips for summer all matter—but confirm the insulation sits at full loft, never squeezed, so you actually get the performance you paid for.
R30 vs R38: Choosing the Right Level for Your Climate
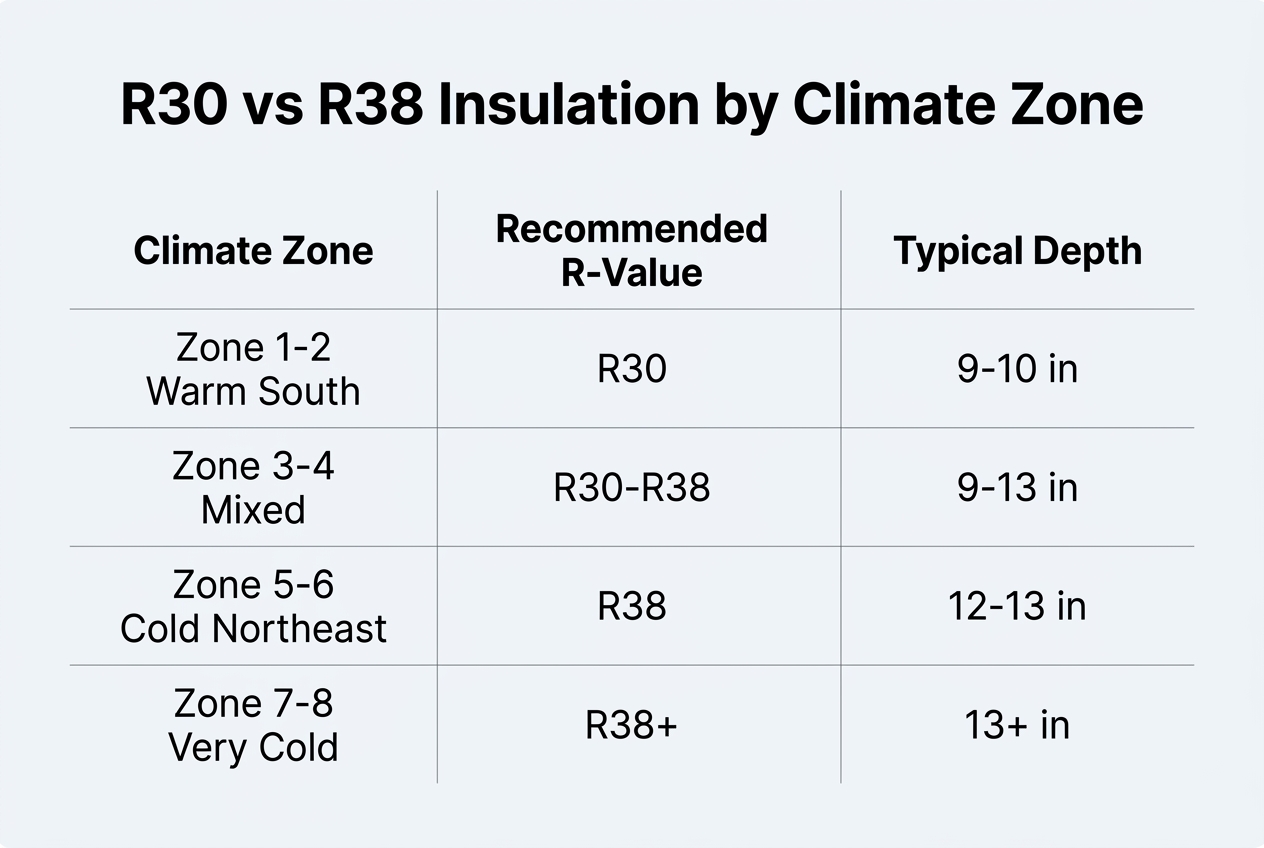
Attic insulation needs shift by region. Homes in cold northern states lose more heat through the roof, so they need thicker layers. Homes in warm southern states can often get by with less. The table below compares typical recommendations across climate zones.
Cold Climate Requirements (Zones 4-8)
Zones 4 through 8 cover most of the Northeast, Midwest, and northern states. Winters run long and cold there. R38 or higher is the common recommendation for attics in these zones. Some far northern areas even call for R49. Extra insulation keeps heating costs down through months of freezing weather.
Warm Climate Requirements (Zones 1-3)
Zones 1 through 3 include Florida, southern Texas, and other warm-weather states. Cooling costs matter more than heating costs here. R30 insulation is often enough for attics in these regions. It still blocks summer heat gain and helps the AC run less.
| Climate Zone | Region Example | Recommended Attic R-Value | Primary Concern |
|---|---|---|---|
| Zone 1-2 | South Florida, South Texas | R30 | Cooling costs |
| Zone 3 | Georgia, Northern California | R30-R38 | Cooling, mild winters |
| Zone 4-5 | New Jersey, Ohio, Virginia | R38 | Heating costs |
| Zone 6-7 | New England, Minnesota | R38-R49 | Extreme cold |
| Zone 8 | Northern Alaska | R49+ | Severe cold |
Matching R-Value to Local Building Codes
Local codes set minimum insulation levels for new construction and major renovations. Checking these codes first can save you from costly rework later. Many projects to improve energy efficiency start by confirming the right R-value for a specific zip code. Products like Knauf® Performance+® R-30 Unfaced Fiberglass batts give you a clear reference point against code minimums.
Where to Install R30 Insulation in Your Home
Attic and Ceiling Applications
The attic is the most common spot for R30 insulation. Heat rises, so an uninsulated attic bleeds energy fast in winter and traps heat in summer. Homeowners in milder climates often pick R30 for attic floors; colder regions may need more. For a side-by-side comparison, this guide on R-30 vs. R-38 Insulation: Which is Right for Your Project? lays out the difference clearly.
Wall Insulation Considerations
Walls rarely use R30, since standard 2×4 stud cavities can’t fit that much material. R30 fits better in thicker 2×8 or 2×10 wall assemblies, found in some newer or custom-built homes.
Floor and Crawl Space Applications
Floors above unheated crawl spaces or garages benefit from R30 too. Consider these placement guidelines:
- Attics with open floor joists, where batts or blown-in fill can reach full depth without gaps.
- Cathedral ceilings with deep rafters that accommodate thicker insulation without ventilation problems.
- Floors over unheated garages, where cold air rises into living spaces above.
- Crawl space ceilings in homes without a conditioned basement.
- Additions or renovated rooms where new framing allows for deeper cavities.
Moisture control matters most in crawl spaces, so pair insulation with proper vapor barriers. A qualified professional offering our services can tell you which areas of your home actually need this level of coverage.
R19 vs R30 Insulation: Key Differences Explained
Performance Differences
People often mix up these two ratings. R19 is thinner and offers less resistance to heat flow than R30. That gap matters most in attics, where heat loss runs highest. The table below breaks down the core differences side by side.
| Feature | R19 Insulation | R30 Insulation |
|---|---|---|
| Typical Thickness | 6-8 inches | 10-12 inches |
| Best Use | Walls, floors | Attics, ceilings |
| Average Cost per Sq Ft | $0.50-$0.80 | $0.70-$1.10 |
| Heat Resistance | Moderate | High |
| Common Climate Fit | Mild regions | Cold, northern regions |
Cost and Material Differences
Material choice drives both price and thickness. Fiberglass batts, blown-in cellulose, and rigid foam each reach these R-values in different ways. A dedicated provider can tell you which material fits your space without wasting depth or budget.
Which One Fits Your Project
Pick R19 for wall cavities with limited space. Pick R30 for attics that need stronger seasonal protection. Pairing new insulation with caulking, weatherstripping, and LED light bulb replacement rounds out a full efficiency upgrade. Learn more in this guide: What Is R30 Insulation? Everything You Need To Know. For background on service standards, read our about us page.
Insulation Material Options to Achieve R30
Unfaced Fiberglass Batts and Rolls
Fiberglass remains the go-to choice for attic floors. It comes in pre-cut batts or long rolls, and it’s affordable, widely available, and easy to handle. Many homeowners shopping for materials find options like Insulation Roll R30 sold in standard widths that fit neatly between joists.
Unfaced batts skip the paper or foil backing. They work best laid over existing insulation, since a second layer doesn’t need its own vapor barrier. Faced batts include paper backing that acts as a vapor retarder. That facing should always point toward the living space, never get buried beneath other insulation, or moisture gets trapped.
Fiberglass performs well when installed without gaps or compression. Squeeze a batt to force it into place and its effective R-value drops fast, sometimes by a third or more. Cut carefully around wiring and fixtures to keep performance intact.
Cellulose and Spray Foam Alternatives
Cellulose is made mostly from recycled newspaper treated with fire retardant, then blown in loosely. It fills odd-shaped attic spaces better than batts can. That makes it a strong pick for older homes with irregular framing or obstructions.
Spray foam offers a higher R-value per inch and seals air along with insulating. It costs more upfront but stops drafts that batts alone can’t touch. Homeowners already scheduling weatherstripping or caulking sometimes bundle that work with foam installation for a tighter overall envelope.
Both materials come with tradeoffs. Cellulose settles a bit over time. Spray foam needs professional equipment and ventilation while it cures. Before scheduling an in-home assessment, it’s reasonable to check a contractor’s privacy policy while comparing quotes.
Polyiso and Rigid Foam Boards
Polyisocyanurate, or polyiso, is a rigid foam board with one of the highest R-values per inch of any common material. It suits attic hatches, rim joists, and spots where thickness is tight.
Rigid boards resist moisture better than fiberglass, but cost more per square foot. For whole-attic coverage, most homeowners still lean on fiberglass or cellulose for value, saving foam board for targeted problem spots.
Installation Steps for R30 Insulation
Preparing the Space and Gathering Materials
Good results start with good prep. Clear the attic floor of boxes and debris, and check for roof leaks first. Measure the total square footage so you buy enough material, then pick a batt sized for your joists, such as R-30 KRAFT FACED INSULATION 16-IN X 48-IN.
Before laying any insulation, handle the small issues that quietly undercut performance. These steps often get paired with the main job:
- Seal gaps around pipes, wiring, and attic hatches with caulking to stop air leaks.
- Apply weatherstripping around access doors so conditioned air stays inside living spaces.
- Check nearby fixtures, since a gas leak repair or light home repair should happen before insulation covers key access points.
- Swap old bulbs for LED light bulb replacement, since older fixtures run hotter and pose a fire risk near new insulation.
Step-by-Step Installation Process
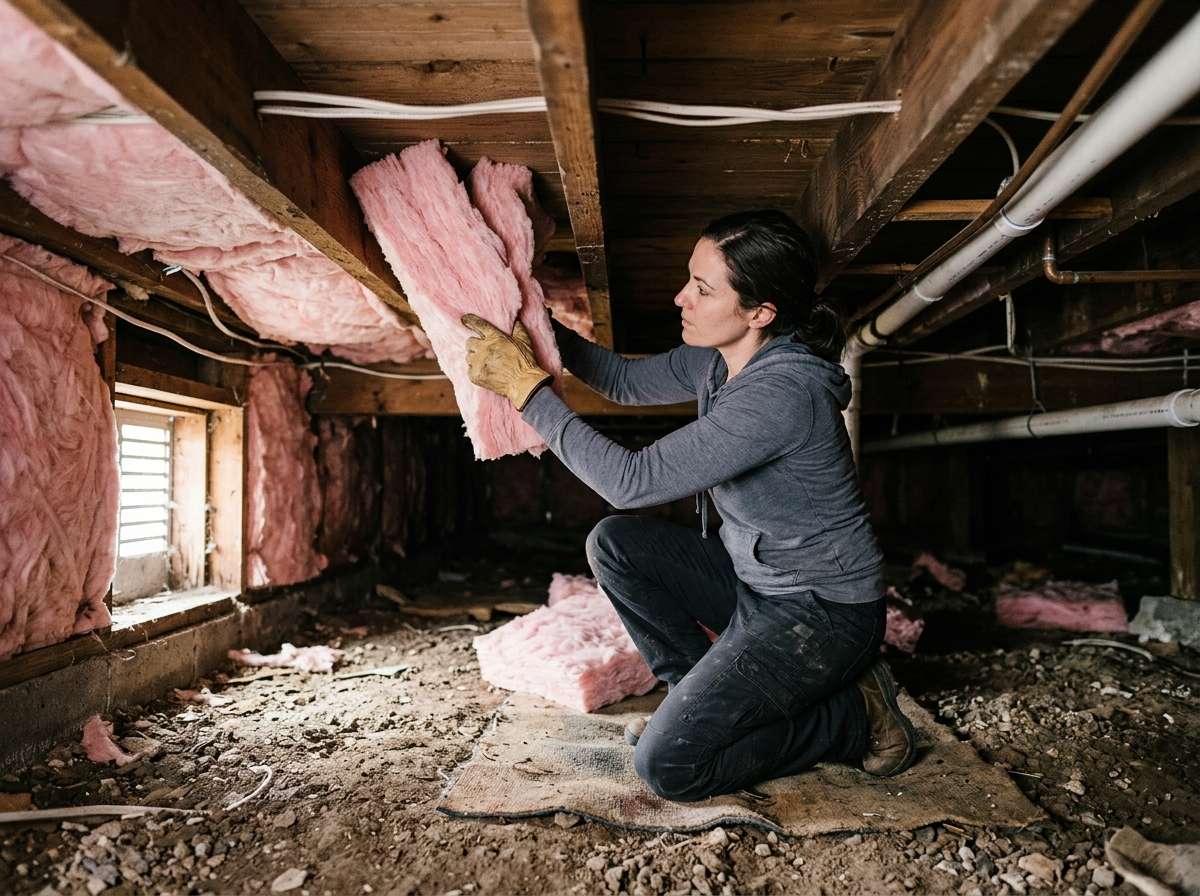
Wear gloves, long sleeves, and a respirator mask—fiberglass fibers irritate skin and lungs. Keep the attic vented while you work. Roll batts between joists, faced side down, and butt the edges tightly without compressing anything. Trim pieces to fit around obstructions instead of forcing them into place.
When to Hire a Professional Installer
Tight attic spaces, tricky rooflines, or existing moisture problems often call for expert help. A trained crew catches issues a homeowner might miss. To schedule an inspection, reach out through contacts before starting a large project.
Cost Considerations: Upfront Price vs Long-Term Savings
Initial Material and Labor Costs
Material costs shift by product type. Fiberglass batts tend to run cheaper per square foot. Blown-in cellulose or mineral wool often costs more but fills gaps better. Expect material prices to range widely depending on brand and the thickness needed to hit R30.
Labor makes up a big share of total project cost. Attics with easy access cost less to insulate than tight crawlspaces or finished walls needing removal work. A crew also has to account for old insulation removal, air sealing, and disposal fees, all of which add to the final bill.
Ask for itemized quotes. That way you can compare material charges against labor charges separately. Bundling insulation with related work, like caulking or weatherstripping, sometimes lowers the per-job rate since the crew is already on-site.
Estimating Long-Term Energy Savings
Payback period measures how long savings take to cover upfront costs. Many homeowners recover insulation costs within three to seven years through lower heating and cooling bills. Older homes with minimal insulation often see faster payback, since the efficiency gains are bigger.
Savings depend on climate, home size, and existing air leaks. Pair insulation upgrades with LED light bulb replacement or appliance updates and the household savings compound over time.
Rebates, Incentives, and Assistance Programs
Many utility companies and state programs offer rebates for insulation upgrades. Income-eligible households may qualify for free or reduced-cost service. Checking a provider’s blog often turns up current rebate details and seasonal offers.
Common Mistakes That Reduce Insulation Performance
Gaps, Compression, and Uneven Coverage
Batts that don’t fit snugly leave small gaps around joists and edges. Even a one-inch gap can let real heat escape. Gaps act like tiny open windows scattered across your attic floor, undermining the whole system.
Compression is another common issue. Cramming insulation into a space to make it fit crushes the trapped air pockets, which lowers its real R-value. A compressed batt rated R30 might perform more like R20 once squeezed under low rafters or stuffed around wiring.
Uneven coverage tends to happen near attic edges, recessed lighting, or storage areas where installers rush the careful work. These thin spots create cold zones that show up as frost patterns on rooftops in winter. A quick visual check—or a look through an installer’s portfolio—helps you spot these patterns before hiring anyone.
Moisture and Vapor Barrier Errors
Vapor barriers control how moisture moves through walls and ceilings. Put one on the wrong side and it traps water vapor inside the wall cavity instead of letting it escape. Over time, that causes mold growth, rotted framing, and insulation that stops working as well.
In most northern climates, the vapor barrier belongs on the warm-in-winter side, facing the living space. Installers sometimes skip this detail, or double up barriers, which blocks any chance of drying out. Combine that with poor caulking or weatherstripping around penetrations, and moisture problems compound fast and quietly.
Poor Attic Ventilation Consequences
Blocked soffit vents or missing ridge vents trap heat and humidity in attics. That raises cooling costs and can warp roof decking over a few seasons.
Poor ventilation also shortens shingle lifespan and encourages ice dams in winter. Balanced airflow keeps insulation dry and performing as designed, year after year.
Is It Time to Upgrade Your Home’s Insulation
How to Check Your Current R-Value
Start in the attic. Grab a flashlight and a tape measure, then check the depth of your existing insulation. If it looks thin, uneven, or squashed, you likely have a performance gap. Loose-fill insulation often settles over time, losing loft and R-value together.
Look for warning signs beyond the attic, too. Cold walls, drafty rooms, and icy patches on the roof in winter often point to poor coverage. Older homes may still have R11 or R19 insulation that no longer meets modern energy standards. Compare what you find against current recommendations to decide if an upgrade makes sense.
The Role of a Professional Energy Audit
A home energy audit digs deeper than a visual check. Technicians use blower-door tests and infrared cameras to find hidden air leaks and thin spots in your insulation. This approach reveals problems invisible to the naked eye, including gaps around wiring, plumbing chases, and attic hatches.
Audits often turn up related issues too. Auditors may flag poor caulking, missing weatherstripping, or drafty windows during the same visit. Many homeowners pair insulation upgrades with LED light bulb replacement or showerhead and aerator swaps, since small fixes add up fast. A thorough audit gives you the full picture instead of a guess.
Getting a Personalized Insulation Estimate
Every home is different. Attic shape, existing material, and climate zone all shape the right insulation plan. A dedicated provider can measure your space accurately and recommend the right R-value target, whether that’s R30, R38, or a blend of materials.
Before scheduling, look at examples of finished work. Browsing a project gallery shows real installations and sets realistic expectations. A personalized estimate makes sure you pay for exactly what your home needs, nothing more.
Before committing to new ductwork or a duct cleaning appointment, it’s worth asking how much of the air you’re paying to heat and cool is actually escaping through the ducts versus slipping out around window frames, door thresholds, and an under-insulated attic floor — a question a qualified duct specialist can answer for the system, and an energy audit can answer for the house itself. If the assessment points toward the building envelope, caulking, weatherstripping, and added attic insulation tend to be the more direct fix, since they stop conditioned air from leaving the living space in the first place. Either way, knowing where the loss really happens saves you from paying for the wrong solution and wondering, a winter later, why the rooms still feel the same.
